-
 Univers
-
 Ebooks
-
 Livres audio
-
 Presse
-
 Podcasts
-
 BD
BD
-
 Documents
-
- Cours
- Révisions
- Ressources pédagogiques
- Sciences de l’éducation
- Manuels scolaires
- Langues
- Travaux de classe
- Annales de BEP
- Etudes supérieures
- Maternelle et primaire
- Fiches de lecture
- Orientation scolaire
- Méthodologie
- Corrigés de devoir
- Annales d’examens et concours
- Annales du bac
- Annales du brevet
- Rapports de stage
La lecture à portée de main

5 pages
English
Le téléchargement nécessite un accès à la bibliothèque YouScribe
Tout savoir sur nos offres
Tout savoir sur nos offres
5 pages
English
Le téléchargement nécessite un accès à la bibliothèque YouScribe
Tout savoir sur nos offres
Tout savoir sur nos offres

Description
7 Lesson 7:Watching Your Finished Movie 7When you finish your iMovie project, you need to export the project into a finished movie format. There are several movie formats to choose from depending on how you want to watch your movie and share it with others. You can: • Post it on the Internet• Send it in an email message• Burn it on a DVD• Save it to DV tape so you can watch it on TV or transfer it to another medium (such as VHS tape)• Send it to a Bluetooth® deviceNo matter which way you choose to view your movie, iMovie makes it easy to create a movie file in the proper format. Creating the finished movie is called exporting the movie, and iMovie’s new Share dialog makes it easy to do.Before You BeginTo make it easier to do the tasks in this lesson, print the lesson before you start.In many tasks shown in this lesson and in iMovie Help, you need to choose menu commands, which look like this:Choose Edit > Clear.The first term after Choose is the name of a menu in the iMovie menu bar (shown below). The next term (or terms) are the items you choose from that menu.1Tutorial Sharing Your MovieiMovie makes it easy for you to share your movies with friends and family. You can use the standard export options provided, or you can customize your exports if you want. Start with the Share dialog, shown below, and choose an option. m To see the Share dialog, choose File > Share.Exporting to DV TapeYou can ...
Informations
| Publié par | Phewyung |
| Nombre de lectures | 16 |
| Langue | English |
Extrait
7 Lesson 7:
Watching Your Finished Movie 7
When you finish your iMovie project, you need to export the project into a finished movie
format. There are several movie formats to choose from depending on how you want to watch
your movie and share it with others. You can:
• Post it on the Internet
• Send it in an email message
• Burn it on a DVD
• Save it to DV tape so you can watch it on TV or transfer it to another medium (such as VHS
tape)
• Send it to a Bluetooth® device
No matter which way you choose to view your movie, iMovie makes it easy to create a movie file
in the proper format. Creating the finished movie is called exporting the movie, and iMovie’s new
Share dialog makes it easy to do.
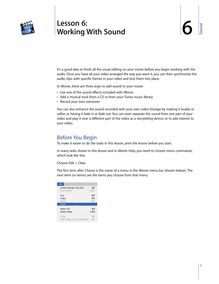
Before You Begin
To make it easier to do the tasks in this lesson, print the lesson before you start.
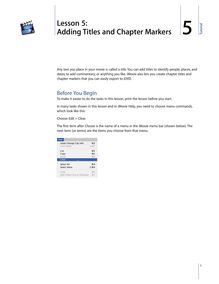
In many tasks shown in this lesson and in iMovie Help, you need to choose menu commands,
which look like this:
Choose Edit > Clear.
The first term after Choose is the name of a menu in the iMovie menu bar (shown below). The
next term (or terms) are the items you choose from that menu.
1
Tutorial
Sharing Your Movie
iMovie makes it easy for you to share your movies with friends and family. You can use the
standard export options provided, or you can customize your exports if you want. Start with the
Share dialog, shown below, and choose an option.
m To see the Share dialog, choose File > Share.
Exporting to DV Tape
You can save your finished movie on DV tape in raw digital video format. This preserves the full
quality of the original video, just as you shot it. Once the movie is exported back to a tape in your
camcorder, you can view it in your camcorder or watch it on TV by connecting your camcorder
directly to your television.
To export your movie back to tape:
1 Connect your camera to your computer using a FireWire cable, as you did to import your footage
onto your hard disk. (For more information, see the first iMovie tutorial lesson, “Getting Your
Video Into iMovie.”)
2 Make sure you have a blank DV tape in your camcorder (or a tape that you don’t mind taping
over) and set your camera to VTR mode.
3 Choose File > Share.
4 Click Videocamera in the toolbar, then type a number in the field to specify how long you want
the computer to wait before it begins exporting the movie. You can also specify if you want to
add black footage on the tape before and after your movie.
5 Click Share.
6 When the movie is finished exporting, you can use the tape as you would any other digital
videotape.
Note: If you have trouble exporting back to your camera, check to see if your tape is write-
protected. Or you may have a PAL device that has FireWire input disabled. Contact the device
manufacturer for more information.
2 Lesson 7: Watching Your Finished Movie
Exporting for iDVD
iMovie can easily create a movie that is optimized to burn on a DVD. If you have iDVD 3 or later,
you can export your project to iDVD and start an iDVD project with a click of a button.
To export a movie to iDVD 3 or later:
1 Click the iDVD button to open the iDVD pane.
2 Click “Create iDVD Project.”
The exported movie appears in the Movies pane in iDVD.
iMovie takes a little while to compress and export your movie. (The time it takes depends on the
length of your movie.) It’s best not to use your computer for other tasks during the export
process.
If you have an earlier version of iDVD installed, or if you want to export your movie in a format
appropriate for DVD authoring, save your movie as Full Quality DV. Any chapter markers you
create in your iMovie project will be preserved.
To save a movie for general DVD authoring:
1 Choose File > Share.
2 Click QuickTime in the toolbar.
3 Choose Full Quality DV from the “Compress movie for” pop-up menu.
4 Click Share.
5 Type a name for your movie file and select a destination.
6 Click Save.
Exporting for Other Viewing Formats
All viewing formats (except for DV tape) are QuickTime formats that differ in size depending on
what they will be used for. For example, if you want to send your movie via email, you will want a
very small QuickTime file size.
To export to QuickTime:
1 Choose File > Share.
2 Click QuickTime in the toolbar.
3 Choose an option from the “Compress movie for” pop-up menu and click Share.
4 Type a name for your movie file and select a destination.
5 Click Save.
iMovie takes a little while to compress and save your movie. It’s best not to use your computer
for other tasks during the export process. How long it takes depends primarily on how long your
movie is, but also on how small the final movie file will be. Smaller movie files take longer to
compress.
Lesson 7: Watching Your Finished Movie 3
The exported movie is a QuickTime file. To watch the movie on your computer screen, double-
click the movie file in the Finder.
QuickTime Expert Export Settings
If one of the preset export options doesn’t work for you, you can experiment with your own
QuickTime compression settings to get video output that’s best suited for your needs.
To apply your own compression settings:
1 Choose File > Share.
2 Click QuickTime in the toolbar.
3 Choose Expert Settings from the “Compress movie for” pop-up menu.
4 Click Share.
5 Choose the type of export format you want and click Options.
Here are a few guidelines to keep in mind as you experiment with your own compression
settings:
• MPEG-4 is the current standard codec (or compression/decompression format) used for movies
that will be viewed on the web. To use the MPEG-4 codec option, you must have QuickTime 6
or later.
• For movies that will be viewed on older Windows computer systems, you may want to use the
Motion JPEG codec.
• For a high-quality movie, you can export your movie in the Sorenson Video codec. This format
reduces the file size of the movie while retaining a relatively high quality.
• In general, choose settings that give you the best tradeoff between file size and video playback
quality.
• Pick your desired movie frame size first. Frame size is the primary determiner of the movie file
size.
• Set the number of key frames next. A low number (such as every 10 frames) creates a better
quality movie with a larger file size.
• Set the frame rate last. You may get choppy video playback if you set the frame rate to more
than 12 frames per second.
4 Lesson 7: Watching Your Finished Movie
Other Ways to Share Your Movies
There are a number of other ways you may want to share your movies.
Email
Send your movie as an attachment in an email message. When you click Email in the Share
dialog, yvie is automatically attached to a blank email. All you have to do is type an
address and a message and click Send.
Internet
Transfer your movie to your iDisk, where you can use HomePage to publish it on the Internet.
Just click HomePage in the Share dialog and type a name for your movie. When you click Share,
your movie is automatically sent to your iDisk and HomePage so you can post it on the Internet.
Bluetooth devices
You can use Bluetooth technology to transfer movies wirelessly to other computers, mobile
phones, personal digital assistants, and more. To use Bluetooth devices with iMovie, your
Bluetooth device must be compliant with the Third Generation Partnership Program (3G-PP) and
have an appropriate video application to be able to display movies.
© .2004 Apple Computer, Inc. All rights reserved.
Apple, the Apple logo, FireWire, iMovie, and QuickTime are trademarks of Apple Computer, Inc., registered in the U.S. and other countries.
iDVD and Finder are trademarks of Apple Computer, Inc. The Bluetooth wordmark and logos are owned by the Bluetooth SIG., Inc., and any
use of such marks is under license. The owner or authorized user of a valid copy of the iMovie software may reproduce this publication for
the purpose of learning or teaching to use the software, excluding commercial or paid-for purposes


-
Univers
-
Ebooks
-
Livres audio
-
Presse
-
Podcasts
-
BD
-
Documents
-
Jeunesse
-
Littérature
-
Ressources professionnelles
-
Santé et bien-être
-
Savoirs
-
Education
-
Loisirs et hobbies
-
Art, musique et cinéma
-
Actualité et débat de société
-
Jeunesse
-
Littérature
-
Ressources professionnelles
-
Santé et bien-être
-
Savoirs
-
Education
-
Loisirs et hobbies
-
Art, musique et cinéma
-
Actualité et débat de société
-
Actualités
-
Lifestyle
-
Presse jeunesse
-
Presse professionnelle
-
Pratique
-
Presse sportive
-
Presse internationale
-
Culture & Médias
-
Action et Aventures
-
Science-fiction et Fantasy
-
Société
-
Jeunesse
-
Littérature
-
Ressources professionnelles
-
Santé et bien-être
-
Savoirs
-
Education
-
Loisirs et hobbies
-
Art, musique et cinéma
-
Actualité et débat de société
- Cours
- Révisions
- Ressources pédagogiques
- Sciences de l’éducation
- Manuels scolaires
- Langues
- Travaux de classe
- Annales de BEP
- Etudes supérieures
- Maternelle et primaire
- Fiches de lecture
- Orientation scolaire
- Méthodologie
- Corrigés de devoir
- Annales d’examens et concours
- Annales du bac
- Annales du brevet
- Rapports de stage
Signaler un problème


YouScribe
Le catalogue
Le service
© 2010-2024 YouScribe