-
 Univers
-
 Ebooks
-
 Livres audio
-
 Presse
-
 Podcasts
-
 BD
BD
-
 Documents
-
- Cours
- Révisions
- Ressources pédagogiques
- Sciences de l’éducation
- Manuels scolaires
- Langues
- Travaux de classe
- Annales de BEP
- Etudes supérieures
- Maternelle et primaire
- Fiches de lecture
- Orientation scolaire
- Méthodologie
- Corrigés de devoir
- Annales d’examens et concours
- Annales du bac
- Annales du brevet
- Rapports de stage
La lecture à portée de main

Vous pourrez modifier la taille du texte de cet ouvrage
Découvre YouScribe en t'inscrivant gratuitement
Je m'inscrisDécouvre YouScribe en t'inscrivant gratuitement
Je m'inscrisEn savoir plus
Vous pourrez modifier la taille du texte de cet ouvrage
En savoir plus

Description
Informations
| Publié par | Andrews UK |
| Date de parution | 26 avril 2012 |
| Nombre de lectures | 1 |
| EAN13 | 9780857475336 |
| Langue | English |
| Poids de l'ouvrage | 1 Mo |
Informations légales : prix de location à la page 0,0524€. Cette information est donnée uniquement à titre indicatif conformément à la législation en vigueur.
Extrait
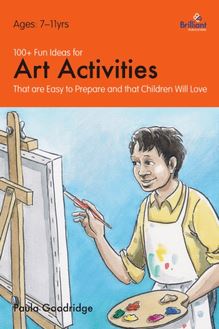
100+ Fun Ideas for Art Activities
That are easy to prepare and that children will love
Paula Goodridge
Published by Brilliant Publications
Unit 10, Sparrow Hall Farm
Edlesborough, Dunstable
Bedfordshire, LU6 2ES, UK
www.brilliantpublications.co.uk
E-mail: brilliant@bebc.co.uk
Digital Edition converted and published in 2012 by
Andrews UK Limited
www.andrewsuk.com
The name Brilliant Publications and the logo are registered trademarks.
Written by Paula Goodridge
Illustrated by Michelle Ives
© Text Paula Goodridge 2009
© Design Brilliant Publications 2009
First printed and published in the UK in 2009
The right of Paula Goodridge to be identified as the author of this work has been asserted by herself in accordance with the Copyright, Designs and Patents Act 1988.
All rights reserved. No part of this publication, with the exception of indicated sections, may be reproduced, stored in a retrieval system or transmitted in any form or by any means, electrical, mechanical, photocopying, recording or otherwise, without the prior written permission of the publisher.
Introduction
The aim of this book is to provide ideas for art activities that teachers can use in the classroom, parents/carers can use at home, or that can be used in children’s clubs. The activities are a fun way for children to learn about art, and they are easy to prepare. They are fully compatible with the National Curriculum.
All ideas have been used in a Key Stage 2 classroom, where groups of children have also enjoyed helping with the preparation of some lessons, under supervision. Most enjoy helping with the clearing away afterwards, especially if they gain a small reward! (See award certificate .)
Although aimed at the Key Stage 2 age group, the ideas could be used for younger children, adapting the activities to suit abilities.
The majority of activities may be used for a whole-class lesson; others are best done in smaller groups, depending on the facilities of your room.
Useful tips
Resources
I have listed resources needed for each activity so you can see at a glance which things will be needed. Below I have listed some extra ideas for obtaining resources, which I have found invaluable in the past, especially if teaching art in the long term. Picture bank - It is of huge use to keep a constant look out for pictures from sources like magazines, the Internet and postcards. Cut these out and back them on cardboard, and sort them into themes such as: buildings, faces, plants, flowers, transport and artists’ work. If you can laminate them, the pictures will last longer. Pictures act as a great stimulus for children, and once you have built up this resource bank, preparation time will be lessened. You may choose to store these centrally, and involve your colleagues in collecting pictures that you can all use. Internet - An excellent resource for finding pictures and information on artists, cultures and religious artefacts. Visitors - Many county councils will have a list of working artists who may be willing to come in and do an art activity for your class. You may have to pay for this, but children tend to benefit greatly from meeting a ‘real-life’ artist. Other visitors, such as art students and historical experts, may also be used as a ‘human stimulus’ for learning in art, but ensure that they have the appropriate checks for working with children. Libraries, art galleries and museums - Librarians and curators of galleries and museums are usually very helpful in providing support with resources or information, so too are tourist information centres and historical/religious societies. Key Stage 2 children could write letters to local sources of interest, so that you may gather resources for a particular topic. Again, this saves your preparation time. The Internet, again, is a good way of finding contact details for these organizations. Teaching centre - Your local teacher support centre may have boxes of artefacts or packs of pictures on a specific theme that you can borrow for a period of time. By making just one telephone call or filling in one form, you gain a whole new resource box for your children! Scrap stores and local businesses - In some areas you can find scrap stores or recycling centres that may let you have resources for free, or for a minimal cost. Local businesses such as printing firms or fabric shops may donate cardboard from packaging or fabric remnants. Parents/Carers - Ask the parents/guardians of your pupils if they have any materials like fabric, wool or buttons that they could donate to an art project.
Children’s ideas book
I’ve found it very useful to provide the children, at the start of the year, with an art book or folder into which they could put down their ideas. They can do rough sketches, try out shading with various pencils or simply stick in pictures that they like. The book is also useful to take outside, should you wish to do some observational drawing in a nature area or at a local historical building. As they have this book in constant use, your preparation time is lowered again, as you are not always searching for paper for planning work.
Paint tips Liquid paints come in all colours, but better results can often be seen when the children mix their own colours. Sometimes just give the children red , yellow and blue , and get them to produce their own colours from these three. KS2 are very capable of doing this and find it very rewarding. They learn much more about colour mixing in this way. If you are using shades avoid black; give them white and ask them to add small amounts of one colour to it gradually. Texture can be changed by adding other materials to paint. For example, experiment by adding flour, sand or PVA glue to paint. Use thick paint for one activity, and then use watery paint for another. Using limited colours can also be very effective. If, for example, you are studying African art, limit the colours to oranges, browns and reds, or get the children to choose just three colours when producing a pattern. Ask the children what is effective about limiting the colours at the end of your session. Above all, experiment!
Paper ideas Try to vary the materials the children use. For example, do not always give white A4 paper to the children; change the colour, size or texture of the paper. Why give them rectangular paper all the time? Why not give them a square or a circle on which to produce their artwork? Could they paint on fabric as opposed to paper? Could they paint or draw on a 3D object first covered in paper? You can also vary the type of pencil, size of brush or clay tools that they may use.
Keeping the children and room tidy
It is a good idea to ask the children to bring in old shirts for use as art aprons, for the more messy activities. Covering all surfaces with old newspapers will help to making tidying up easier.
Drawing
1. Runner beans
This section may be printed/photocopied for use by the purchaser only.
You will need: sketching pencils; runner beans; pale green sugar paper; chalks. Give each child a runner bean, and ask them to really look at it. Do they see different shades of green? Are there any other colours or markings? What does the bean feel like? What is it shaped like? Give them each a long, thin rectangle of pale green sugar paper and a sketching pencil. Ask them to lightly sketch their runner bean, filling up as much of the paper as they can. Once they are happy with their sketch, get them to colour in their beans, using shades of green and possibly brown chalks. By using white chalk and smudging the white into the greens, they can obtain varying shades. To get the beans to appear 3D, ask the children to look at dark and light shades on their bean. By shading darker patches the bean will appear fuller instead of flat.
2. Sweetcorn
This section may be printed/photocopied for use by the purchaser only.
You will need: sketching pencils; brown sugar paper; sweetcorn (ideally one for each child); oil pastels; thin charcoal. Look very carefully at some sweetcorn. As with the runner-bean activity, ask the children about the colours or the shades that they see as well as markings and patterns. How can they make the sweetcorn look round, not flat? Give them each a rectangle of brown sugar paper, and ask them to sketch their sweetcorn. When they are happy, ask them to colour in their sweetcorn using oil pastels. Oil pastels do not smudge, like chalk, so pupils will need to vary the pressure to get different shades of colour. Use the charcoal after they have used the oils, to outline the sweetcorn and to go over any patterning that they wish to stand out. Other vegetables may be used for the above, but sweetcorn always seems to produce good results!
3. Fruit
This section may be printed/photocopied for use by the purchaser only.
You will need: pictures of fruit by various artists; pencils; chalks and pastels; sugar paper; various fruits. Show the pictures to your group and discuss what they see. Explain that we use the term ‘still life’ to describe a work of art depicting mostly inanimate subject matter. They can either be of natural items (e.g. food, plants, stones or shells) or man-made items (e.g. vases, coins, artefacts, etc). Ask the children to each choose one of the fruits you have brought, and ask them to draw it. They may choose to colour it using chalks, chalk pastels or oil-based pastels. Create a picture of a large bowl and place


-
Univers
-
Ebooks
-
Livres audio
-
Presse
-
Podcasts
-
BD
-
Documents
-
Jeunesse
-
Littérature
-
Ressources professionnelles
-
Santé et bien-être
-
Savoirs
-
Education
-
Loisirs et hobbies
-
Art, musique et cinéma
-
Actualité et débat de société
-
Jeunesse
-
Littérature
-
Ressources professionnelles
-
Santé et bien-être
-
Savoirs
-
Education
-
Loisirs et hobbies
-
Art, musique et cinéma
-
Actualité et débat de société
-
Actualités
-
Lifestyle
-
Presse jeunesse
-
Presse professionnelle
-
Pratique
-
Presse sportive
-
Presse internationale
-
Culture & Médias
-
Action et Aventures
-
Science-fiction et Fantasy
-
Société
-
Jeunesse
-
Littérature
-
Ressources professionnelles
-
Santé et bien-être
-
Savoirs
-
Education
-
Loisirs et hobbies
-
Art, musique et cinéma
-
Actualité et débat de société
- Cours
- Révisions
- Ressources pédagogiques
- Sciences de l’éducation
- Manuels scolaires
- Langues
- Travaux de classe
- Annales de BEP
- Etudes supérieures
- Maternelle et primaire
- Fiches de lecture
- Orientation scolaire
- Méthodologie
- Corrigés de devoir
- Annales d’examens et concours
- Annales du bac
- Annales du brevet
- Rapports de stage

