-
 Univers
-
 Ebooks
-
 Livres audio
-
 Presse
-
 Podcasts
-
 BD
BD
-
 Documents
-
- Cours
- Révisions
- Ressources pédagogiques
- Sciences de l’éducation
- Manuels scolaires
- Langues
- Travaux de classe
- Annales de BEP
- Etudes supérieures
- Maternelle et primaire
- Fiches de lecture
- Orientation scolaire
- Méthodologie
- Corrigés de devoir
- Annales d’examens et concours
- Annales du bac
- Annales du brevet
- Rapports de stage
La lecture à portée de main

5 pages
English
Le téléchargement nécessite un accès à la bibliothèque YouScribe
Tout savoir sur nos offres
Tout savoir sur nos offres
5 pages
English
Le téléchargement nécessite un accès à la bibliothèque YouScribe
Tout savoir sur nos offres
Tout savoir sur nos offres

Description
2 Lesson 2: Removing Unwanted Scenes 2After you import your video into iMovie, you may want to preview the clips so you can see what you have to work with. Then you can “clean up” your video footage, throwing out the parts you don’t like, and keeping only the best moments to include in your movie. (To learn about importing your video into iMovie, see Lesson 1, “Getting Your Video Into iMovie.”)Before You BeginTo make it easier to do the tasks in this lesson, print the lesson before you start.In many tasks shown in this lesson and in iMovie Help, you need to choose menu commands, which look like this:Choose Edit > Clear.The first term after Choose is the name of a menu in the iMovie menu bar (shown below). The next term (or terms) are the items you choose from that menuPreviewing Your Video Clips Each second of video is made up of approximately 30 separate pictures, or frames. To find the exact moments that you want to keep or delete from your clips, you can play through each clip at normal speed, or move through it frame by frame.Frame rates for NTSC and PAL formatsNTSC (National Television Standards Committee) and PAL (Phase Alternating Line) are two digital video formats. The NTSC format, which is used in North America, has a frame rate of 29.97 frames per second (fps). The PAL format, which is used in most of the world outside North America, has a frame rate of 25 fps.1Tutorial To move through ...
Informations
| Publié par | Fyon |
| Nombre de lectures | 22 |
| Langue | English |
Extrait
2
Lesson 2: Removing Unwanted Scenes
2
After you import your video into iMovie, you may want to preview the clips so you can see what you have to work with. Then you can “clean up” your video footage, throwing out the parts you don’t like, and keeping only the best moments to include in your movie. (To learn about importing your video into iMovie, see Lesson 1,“Getting Your Video Into iMovie.”)
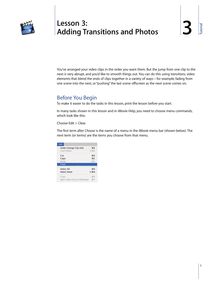
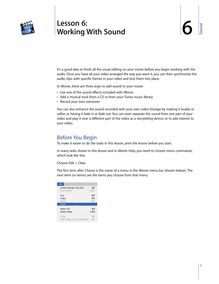
Before You Begin To make it easier to do the tasks in this lesson, print the lesson before you start.
In many tasks shown in this lesson and in iMovie Help, you need to choose menu commands, which look like this:
Choose Edit > Clear.
The first term afterChooseis the name of a menu in the iMovie menu bar (shown below). The next term (or terms) are the items you choose from that menu
Previewing Your Video Clips Each second of video is made up of approximately 30 separate pictures, orframes. To find the exact moments that you want to keep or delete from your clips, you can play through each clip at normal speed, or move through it frame by frame.
Frame rates for NTSC and PAL formats NTSC (National Television Standards Committee) and PAL (Phase Alternating Line) are two digital video formats. The NTSC format, which is used in North America, has a frame rate of 29.97 frames per second (fps). The PAL format, which is used in most of the world outside North America, has a frame rate of 25 fps.
1
2
Rewind
To move through a clip at normal speed: •Select the clip and click Play in the iMovie playback controls. •Click Rewind to move to the beginning of the clip. •Click Play Full Screen to play the video in full-screen mode. (Click anywhere on the screen to return to normal view.)
Play Full Screen
Play To play through a clip frame by frame: 1Select the clip in the clip viewer or timeline viewer. 2Press the Right and Left Arrow keys on your keyboard to move forward or back. Each time you press the arrow key, you move forward or back by one frame.
To play through the entire sequence of clips in the clip viewer: 1Choose Edit > Select None. 2Move the playhead to the beginning of the movie. 3Click Play.
To select multiple clips: •Hold down the Shift key and select the first and last clips in a range. All the clips in between are also selected and can be played as a unit in the iMovie monitor. •Hold down the Command key to select individual clips that aren’t next to each other.
Removing Unwanted Video To create a polished movie, begin by removing footage that you don’t want to include. There are three ways to get rid of unwanted frames in a video clip: •Trimming:Removes the frames you select. Use this when you want to delete frames from one end or another. •Cropping:Preserves the selected part of a clip and removes the frames before and after your selection. Use this when you want to keep most of the clip, but you want to delete the beginning and the end. •Splitting:Breaks a scene into two separate clips. Use this when you want to separate a clip into two pieces. You can then delete one of the pieces or use it elsewhere in your movie.
Lesson 2: Removing Unwanted Scenes
Trimming a Clip To trim a clip, you select the frames in a clip that you don’t want to keep and then delete them.
To trim a video clip: 1Select a clip in the clip viewer or timeline viewer. 2Locate the crop markers under the scrubber bar and drag the left crop marker until you see the first frame you want to remove displayed in the iMovie monitor.
3Drag the right crop marker to the last frame that you want to remove. The selected frames in the clip appear yellow in the scrubber bar, as shown above. 4Choose Edit > Clear (or press the Delete key) to trim the selected frames from the clip. Cropping a Video Clip To crop a clip, you select the frames that you want to keep and delete the rest of the clip. Cropping is often the easiest method when you want to preserve the middle part of a clip and delete the beginning and the end. To crop a clip: 1Select a clip in the clip viewer or timeline viewer. 2Drag the right crop marker along the scrubber bar until you see the last frame that you want to keep. 3Drag the left crop marker along the scrubber bar until you see the first frame that you want to keep.
4Choose Edit > Crop to delete the frames outside the range of frames you selected. The selected frames are preserved. Splitting a Video Clip When you split a video clip, you simply break it into two clips, preserving both parts. You can then delete the part you don’t want or save it to use elsewhere in your movie. To split a video clip: 1Select a clip in the clip viewer, timeline viewer, or Clips pane. 2Drag the playhead in the scrubber bar to find the exact frame where you want to break the clip. 3Choose Edit > Split Clip at Playhead. A new clip immediately appears. (If you split a clip that is only in the Clips pane, the split clip appears only in the Clips pane.)
Lesson 2: Removing Unwanted Scenes
3
4
Undoing an Edit If you make a mistake as you work, you can undo your action.
To undo an action: m Choose Edit > Undo. iMovie remembers and lets you undo up to ten actions.
Direct Trimming Now that you know how to use the crop markers and scrubber bar to trim and crop your clips, you can try your hand at a more advanced technique that can save you some time once you get the hang of it.
Click the timeline viewer button (it has a clock on it) to open the timeline viewer. You can drag your clips in the timeline viewer to shorten or extend them, or to add empty space between clips. There are some important points to understand before you start, so read this section carefully.
Where You Grab Your Clip Matters In the timeline viewer, you get different results depending on where you place the pointer when you drag a clip.
Dragging from the center of the clip moves the clip to a different location in your movie. As you move the clip to the right or left, a gap is created. You can drag other clips to fill the gap, or you can leave a gap for your own artistic reasons (they’re handy backgrounds for text or can add an extra dimension to a transition or effect). Gap Dragpointer
Dragging from the end of a clip toward the center of the clip shortens, or trims, the clip. The trimmed video is still present (as long as you don’t empty the iMovie Trash), but it isn’t displayed and won’t appear in your movie. If you decide to extend the clip back to its original size (or close to the original size), you can drag the end you want to extend. If you empty the iMovie Trash, the trimmed part is deleted and you won’t be able to extend the clip.
Direct trimming pointer
Lesson 2: Removing Unwanted Scenes
Rippling and Overwriting Clips If you move a clip over an empty space, the clip replaces, or overwrites, the empty space. If you move a clip over another clip, the clip you’re moving “ripples” the clip and all the adjoining clips, or moves them all in the direction you’re dragging.
If you decide that you want to overwrite a clip with another clip, you can hold down the Command key as you drag. The clip you’re moving will begin to overwrite (or trim) the other clip. If you hold the Command key down while you move a clip over empty space, it will ripple the empty space.
Identifying Full and Cropped Clips Once you begin moving clips, you’ll notice a difference in the appearance of clips in the timeline viewer. Full clips have rounded corners. Clips that have been trimmed or cropped have straight edges where they’ve been shortened. A clip with straight ends can always be extended if you haven’t emptied the iMovie Trash since you trimmed the clip.
Trimmed clip
Full clip About Gaps (Color Clips) The gaps, or empty spaces, that you create are sometimes called “black clips” because they look like black clips in the clip viewer. When you view your movie, you see empty black video where gaps appear. However, you can change them from black to any color you want, so those gaps are known as “color clips” in iMovie.
You can use color clips as spacers or placeholders in your movie, or you can use them as background for text or titles. You can’t select or move them in the timeline viewer, but you can in the clip viewer. To change the color of a color clip: 1Select the color clip in the clip viewer. 2Choose File > Show Info. 3Click the color box and choose a new color. 4Click Set. 5Close the Color box.
©2004 Apple Computer, Inc. All rights reserved. Apple, the Apple logo, and iMovie are trademarks of Apple Computer, Inc., registered in the U.S. and other countries. The owner or authorized user of a valid copy of the iMovie software may reproduce this publication for the purpose of learning or teaching to use the software, excluding commercial or paid-for purposes.


-
Univers
-
Ebooks
-
Livres audio
-
Presse
-
Podcasts
-
BD
-
Documents
-
Jeunesse
-
Littérature
-
Ressources professionnelles
-
Santé et bien-être
-
Savoirs
-
Education
-
Loisirs et hobbies
-
Art, musique et cinéma
-
Actualité et débat de société
-
Jeunesse
-
Littérature
-
Ressources professionnelles
-
Santé et bien-être
-
Savoirs
-
Education
-
Loisirs et hobbies
-
Art, musique et cinéma
-
Actualité et débat de société
-
Actualités
-
Lifestyle
-
Presse jeunesse
-
Presse professionnelle
-
Pratique
-
Presse sportive
-
Presse internationale
-
Culture & Médias
-
Action et Aventures
-
Science-fiction et Fantasy
-
Société
-
Jeunesse
-
Littérature
-
Ressources professionnelles
-
Santé et bien-être
-
Savoirs
-
Education
-
Loisirs et hobbies
-
Art, musique et cinéma
-
Actualité et débat de société
- Cours
- Révisions
- Ressources pédagogiques
- Sciences de l’éducation
- Manuels scolaires
- Langues
- Travaux de classe
- Annales de BEP
- Etudes supérieures
- Maternelle et primaire
- Fiches de lecture
- Orientation scolaire
- Méthodologie
- Corrigés de devoir
- Annales d’examens et concours
- Annales du bac
- Annales du brevet
- Rapports de stage
Signaler un problème


YouScribe
Le catalogue
Le service
© 2010-2024 YouScribe